SuperDirt MIDI

Remember that good old tidal-midi Haskell package? You won’t need it any more! Now you can control your favorite MIDI synth from Tidal with SuperDirt MIDI, and with no other dependencies.

If you’re more of a video-watching person, check out the video tutorial:

Ready to jump in? In this post we’ll cover prerequisites and usage.

Prerequisites

Prerequisites/installation requires later versions of Tidal and SuperDirt:

  1. Upgrade to the latest Tidal (this post assumes version 0.9.10 or greater)
  2. Make sure you have the latest SuperDirt quark. Uninstalling and reinstalling the SuperDirt quark might be easiest. See github.com/supercollider-quarks/quarks for details.

Usage

To begin, you’ll start in SuperCollider. Start up SuperDirt as you normally would. Then, in SuperCollider eval the following code:

MIDIClient.init;

You should now see a list of the system MIDI devices in SuperCollider’s post window. The output will look something like this:

MIDI Sources:
	MIDIEndPoint("LoopBe Internal MIDI", "LoopBe Internal MIDI")
	MIDIEndPoint("Focusrite USB MIDI", "Focusrite USB MIDI")
MIDI Destinations:
	MIDIEndPoint("Microsoft GS Wavetable Synth", "Microsoft GS Wavetable Synth")
	MIDIEndPoint("LoopBe Internal MIDI", "LoopBe Internal MIDI")
	MIDIEndPoint("Focusrite USB MIDI", "Focusrite USB MIDI")

Take note that these MIDI devices have two parts to their names. You will need both parts in the next step, which
is to actually connect to the MIDI device. Eval the following line:

~midiOut = MIDIOut.newByName("Focusrite USB MIDI", "Focusrite USB MIDI"); // substitute your own device here

Above, we have stored a reference to the device in a variable named ~midiOut.

Finally, define the name of the “synth” in Tidal you will use to control this device. Below, we will call it “midi”. Eval the following line:

~dirt.soundLibrary.addMIDI(\midi, ~midiOut);

Optionally, you can define a latency value on your device:

~midiOut.latency = 0.45;

That’s it for initialization. You should now have a MIDI device connected in SuperDirt, running as a synth named “midi”.

Usage in Tidal

Note Patterns

Now we can start writing some Tidal patterns to control the MIDI device. Let’s send it a trivial note pattern:

d1 $ n "0 2 4 7" # s "midi"

That should play a simple four-note pattern. Notice we’re just using the synth name “midi” to send notes to the MIDI device. Piece of cake eh?

You can also use the note-name and octave notation:

d1 $ n "c4 d4 e5 g3" # s "midi"

MIDI Channels

The default MIDI channel is 1. SuperDirt MIDI channels are indexed starting at zero, so MIDI channel 1 is `midichan 0`:

d1 $ note "0 2 4 7" # s "midi" # midichan 0

If your synth is listening on a different channel, let’s say, MIDI channel 5, you would use `midichan 4`:

d1 $ note "0 2 4 7" # s "midi" # midichan 4

Notice that `midichan` accepts a pattern of numbers, so you can use a pattern to play on different MIDI channels:

d1 $ note "0 2 4 7" # s "midi" # midichan "0 4"

The above pattern plays notes “0 2” on channel 1 and “4 7” on channel 5.

CC Params

To send a CC param to your synth, the best way to do it in the new SuperDirt MIDI is with a different Tidal pattern. To create this pattern, you’ll be using
two new SuperDirt MIDI params:

  • ccn – the CC param number you want to control: `ccn 30`
  • ccv – the value to send to the CC param, ranging from 0 to 127: `ccv 64`

Here’s a full example, sending a value of 64 to CC param 30:

d2 $ ccv 64 # ccn 30 # s "midi"

You can of course also specify the MIDI channel with `midichan`:

d2 $ ccv 64 # ccn 30 # s "midi" # midichan 4

You can specify patterns of CC values:

d2 $ ccv "20 40 60 80 100" # ccn 30 # s "midi"
d2 $ ccn "30*4" # ccv (scale 20 100 $ slow 30 sine) # s "midi"

Note that the left-most pattern defines the rhythm, as always with Tidal.

If you have a specific feature on your device that listens on a specific CC number, you can give it a friendly name if you wish:

let ringMod = 30
d2 $ ccv "0 20 50 60" # ccn ringMod # s "midi"

If you have many CC params you want to control at once, a `stack` works well:

d2 $ density 8 $ stack [
  ccn 30 # ccv (scale 0 127 $ slow 30 sine),
  ccn 31 # ccv "[0 70 30 110]/3",
  ccn 32 # ccv 10 
  ] # s "midi"
Atom package v0.12.1: current directory boot file

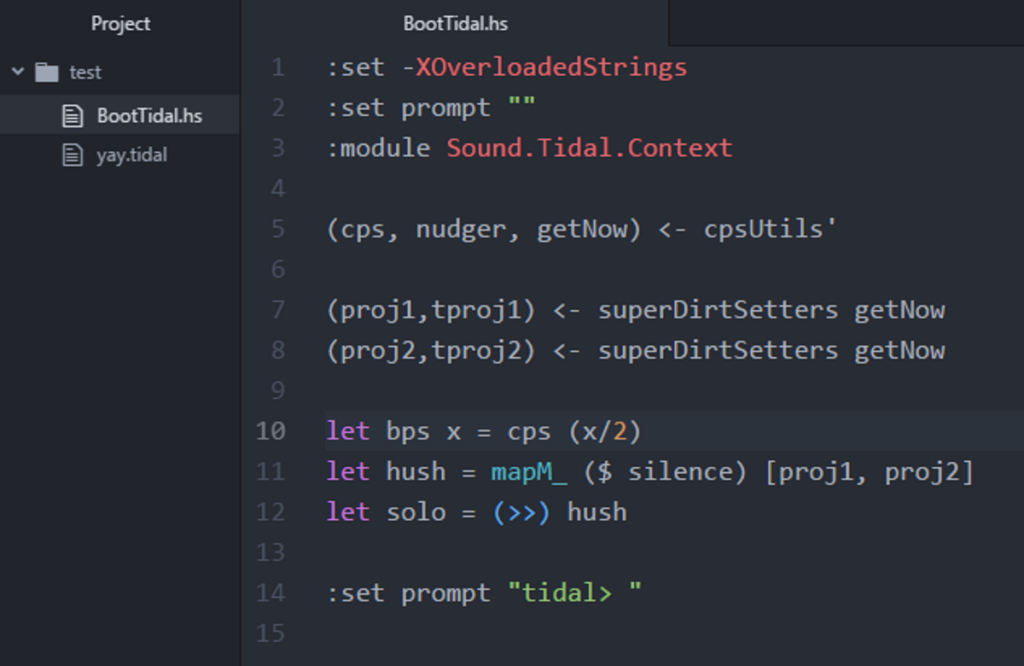
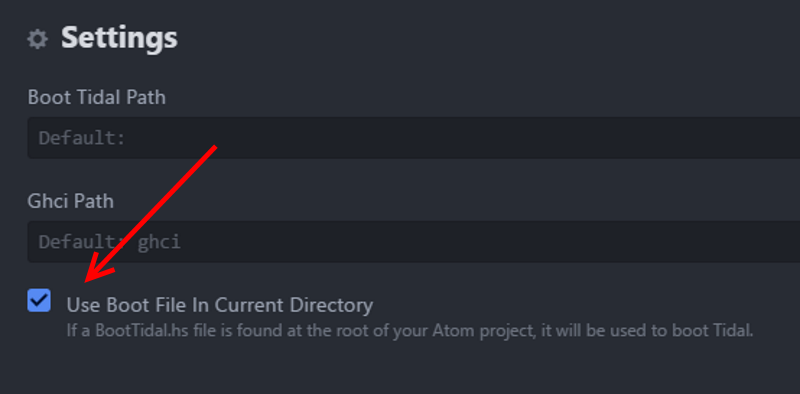
The latest version (0.12.1) of the TidalCycles package for Atom has a new option to use a bootup file in your current project directory:

What this means is that you can now have a custom bootup file for each “project” you may be working on (e.g. compositions, MIDI modules, custom OSC setups, live sets, etc).

All you need to do for this to work is to create a BootTidal.hs file at the root of your Atom project folder:

If you’re not sure where to start with a custom boot file, you can reference a sample default one on the TidalCycles Atom package page, or use this code:

:set -XOverloadedStrings
:set prompt ""
:module Sound.Tidal.Context

(cps, nudger, getNow) <- cpsUtils'

(d1,t1) <- superDirtSetters getNow
(d2,t2) <- superDirtSetters getNow
(d3,t3) <- superDirtSetters getNow
(d4,t4) <- superDirtSetters getNow
(d5,t5) <- superDirtSetters getNow
(d6,t6) <- superDirtSetters getNow
(d7,t7) <- superDirtSetters getNow
(d8,t8) <- superDirtSetters getNow
(d9,t9) <- superDirtSetters getNow


let bps x = cps (x/2)
let hush = mapM_ ($ silence) [d1,d2,d3,d4,d5,d6,d7,d8,d9]
let solo = (>>) hush

:set prompt "tidal> "

With these configuration options, you can now have complete control over your own custom Tidal boot code rather than modifying the source code of the package’s boot file.

For more information check out this video that explores all of the boot options in the Atom Tidalcycles package:

How to connect Tidal to MaxMSP

Normally, when you open up Tidal and start live coding you are connected to the SuperCollider based synthesizer SuperDirt.

The way the two communicate is through an Open Sound Control (OSC) connection – a handy protocol designed for sending sound-related data over a network (in this instance locally, within your computer).

This means that every time you “play a note” in Tidal you are sending off a bundle of parameter data – note values, duration, current cycle number, etc. – as a neatly organized data package containing all the information necessary for SuperCollider to setup and play a sound.

One of the many fantastic things about this relationship – where Tidal is in charge of the composition process and SuperCollider is in charge of the sound synthesis – is its modularity (and as such: hackability).

Practically, what this means is you can simply unplug Tidal from SuperCollider and plug it in to other environments – any environment, actually, that is able to receive data over OSC. One such environment is the very popular Max MSP.

Hello Max

Connecting Tidal Cycles and Max MSP is a very rewarding way of harnessing the power of Tidal’s pattern system to explore the immense possibilities of Max MSP. Using this method, you can set up Tidal patterns to control visuals made in Jitter, manipulate a Max MSP based synthesis engine / instrument or funnel the data to Max4Live (which I will show to do later on).

To get up and running, I have made a simple setup which can be downloaded from Github. It consists of three things:
1. A Haskell module (called MaxMspOsc) that defines the OSC connection to Max MSP
2. A very simple tidal example ( tidal-maxmsp-example.tidal ) that sends off a pattern of data
3. Max MSP project ( tidal-maxmsp.maxproj ) with a simple patch receiving the data from Tidal.

Inside the max patch

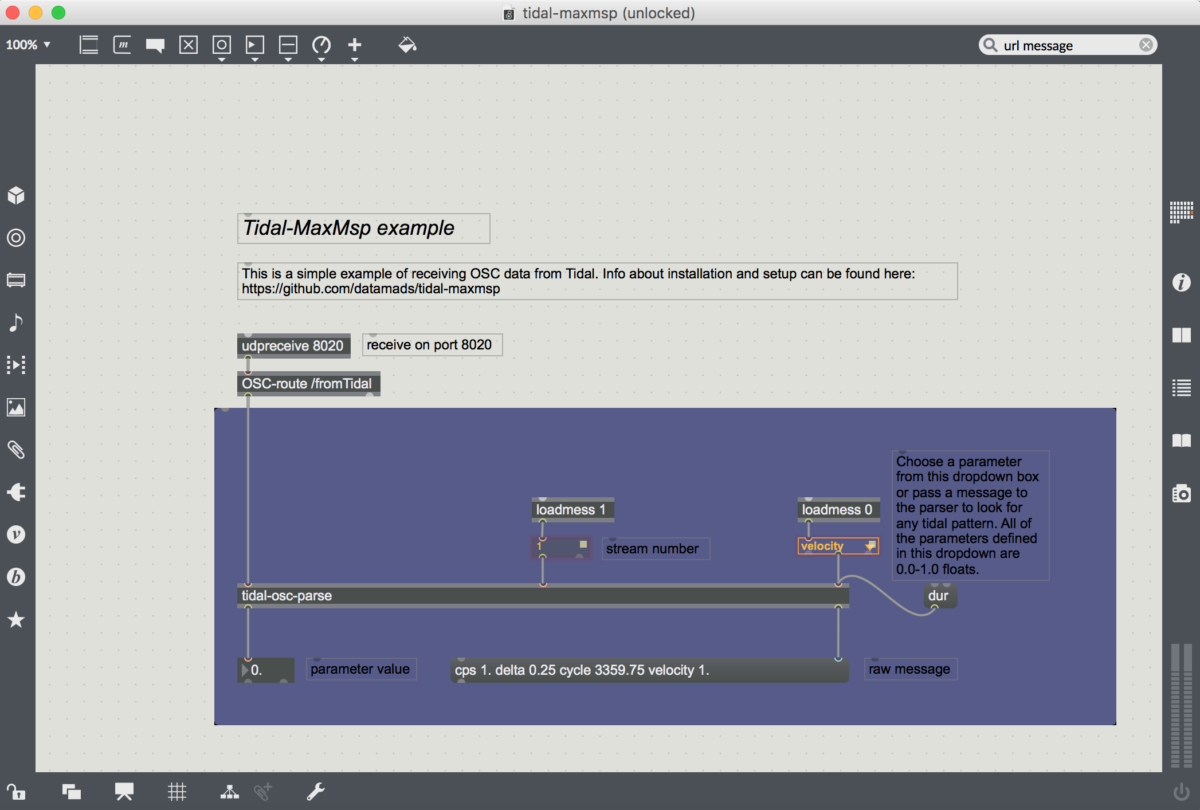
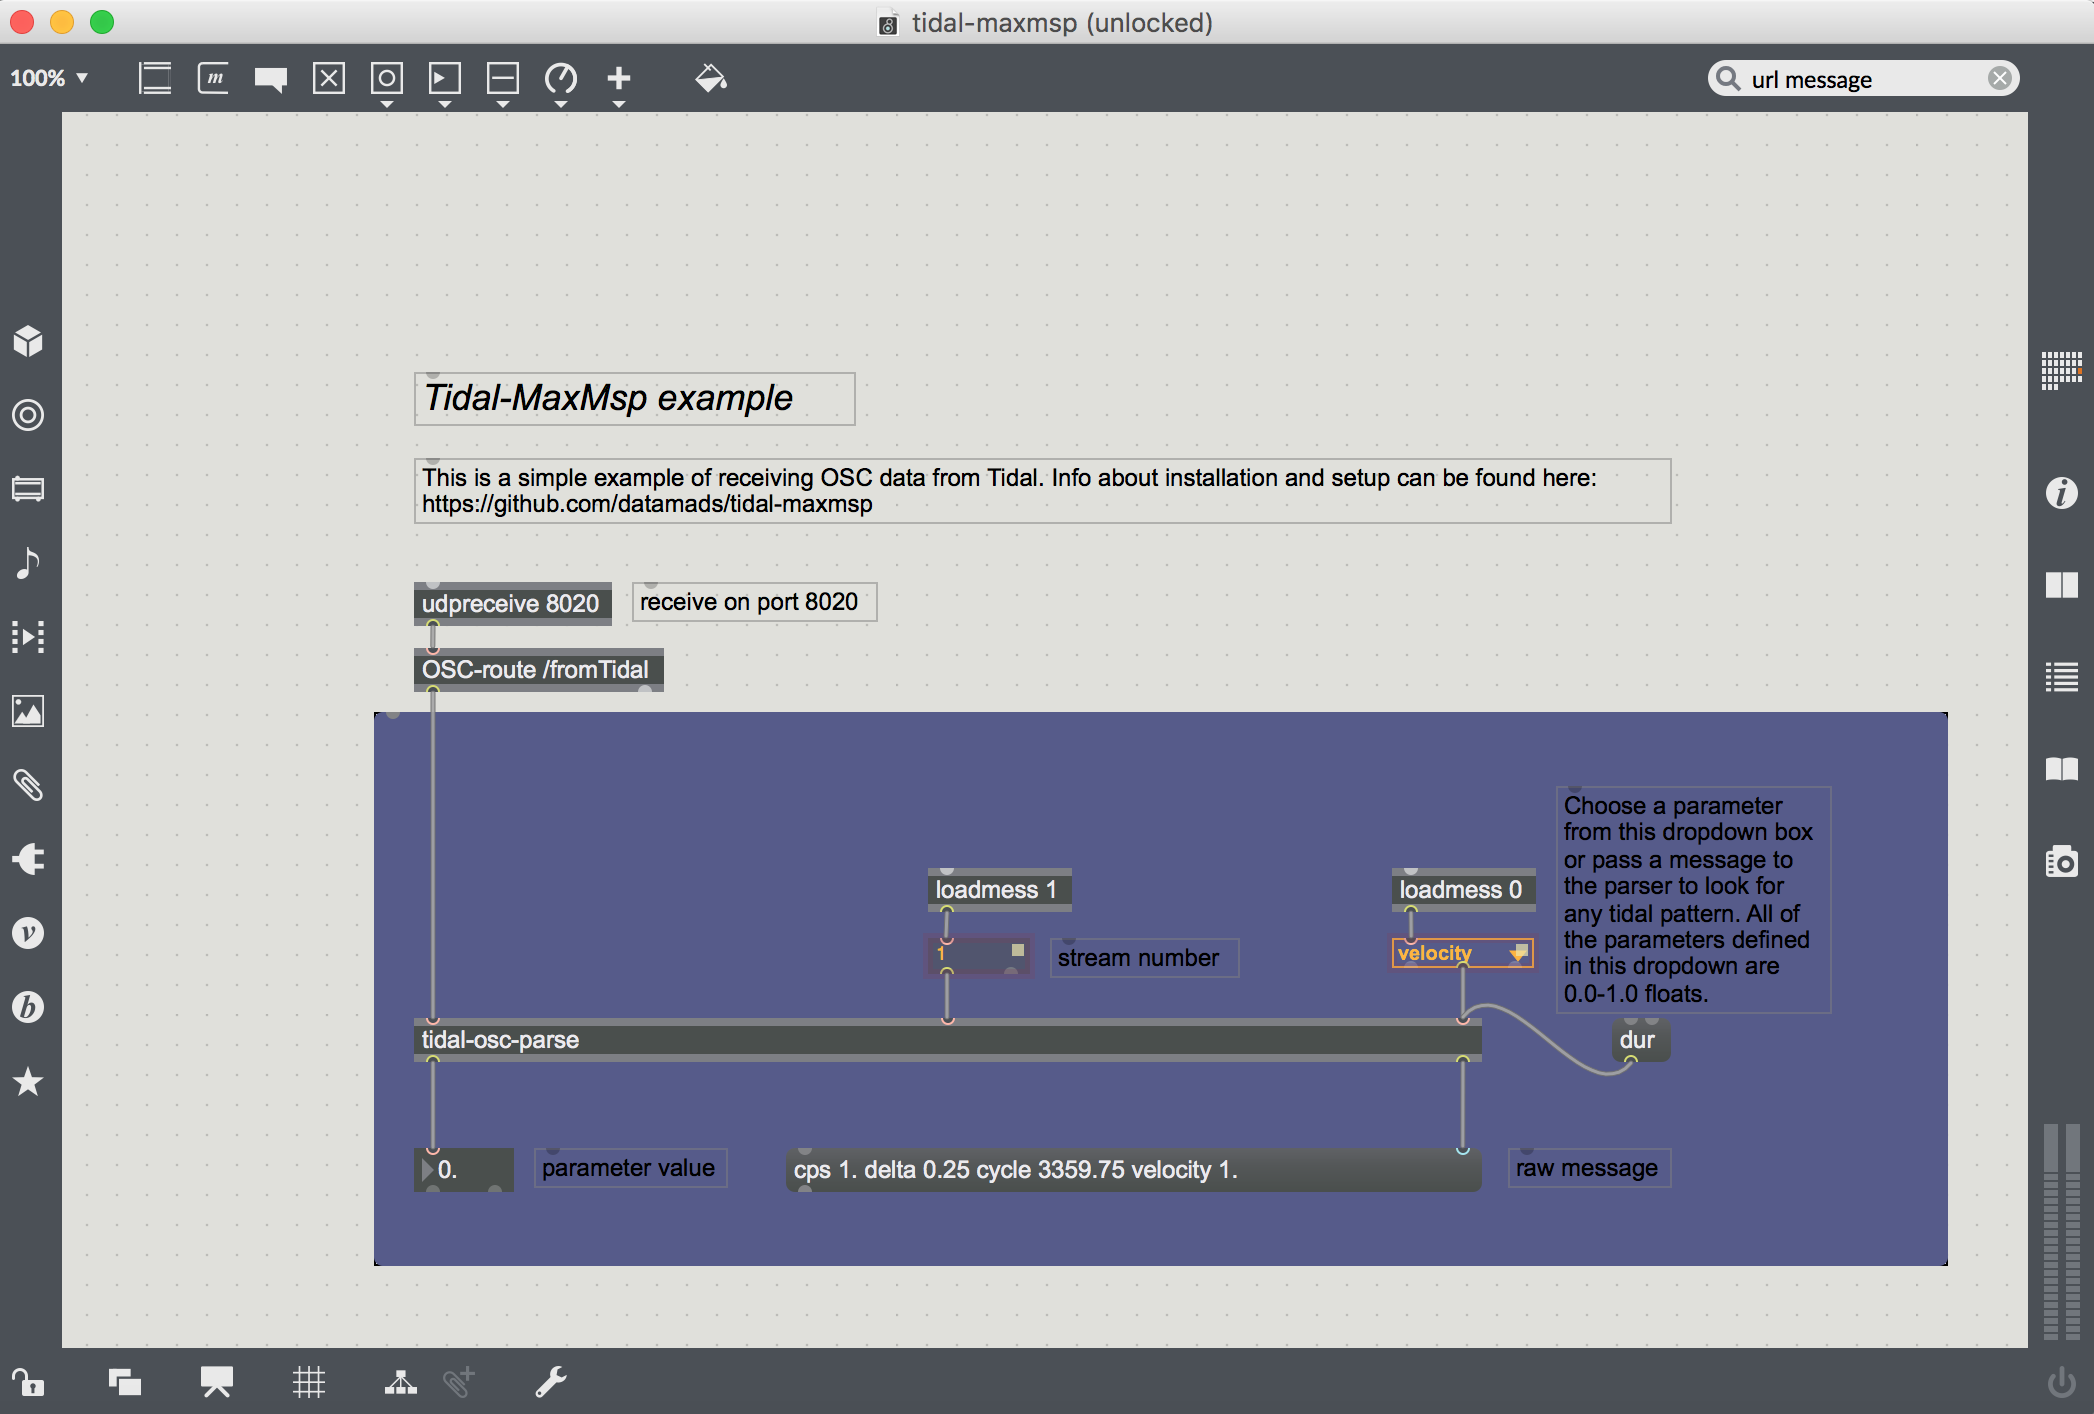
Once everything is installed, you should open up the tidal-maxmsp.maxproj. This is where you will receive the OSC data. Any of the standard tidal parameters are available as well as a few extra parameters defined in the MaxMspOsc module (see the dropdown on the right side of the patch which contains all of these custom parameters which are all float values of 0.0 to 1.0 for consistency’s sake).

At the top of the patch is a udpreceive object which is the network object that will receive the OSC data from tidal. It has one parameter defined, the port number, which is set to 8020 both here and in Tidal (you can change it another integer number as long as both Max MSP and Tidal are using the same port number).

Below it is an OSC-route object which looks for any OSC bundles with a url starting with /fromTidal and passes it on to the tidal-osc-parse abstraction.

If you double click the tidal-osc-parse abstraction you will see a small patch which has three inlets. The first is for the raw osc data from the OSC-route object. Inlet 2 receives the stream number (defined in Tidal) and inlet 3 takes the parameter name to look for. It breaks down the OSC message into pairs of parameters / values and looks for the one defined in inlet 3 and spits it out of it’s left outlet (and the raw message without any url at it’s right outlet).

Now, head back to Tidal and open up tidal-maxmsp-example.tidal. At the top of this file you’ll see an import statement for the Haskell module. Evaluate this line – if you don’t get an error, you most probably installed it correctly. Now evaluate max1 <- maxmspStream “127.0.0.1” 8020 1 and the last line to start sending OSC data.

If you head back to Max you should now see the values of the velocity pattern defined in Tidal now showing up in the float box in the bottom of the patch and all of the raw bundle in the message box.

That’s it!

Try connecting the float box to whatever Max MSP project you have, or if you want: Get more Tidal parameters by copying and pasting everything inside of the purple panel and changing the dropdown or message at the rightmost inlet of the tidal-osc-parse abstraction (and changing the tidal code accordingly).

Now, this is just a basic example which is not super precise in terms of timing. To get more precision we need to add time stamps/tags to make sure everything is played on time but this basic patch should get you started.

Elastic Tempo Flux

I just published a new tutorial video on how to achieve continuous, elastic tempo changes in TidalCycles.

The video covers techniques with two different functions: nudge and spaceOut.

nudge

You can use nudge to move the timing of events into the future. Here, we schedule each of the four cp samples with future times of 0, 0.7, 0.2, and 0.4 seconds, respectively:

d1 $ sound "cp*4" # nudge "0 0.7 0.2 0.4"

The above example isn’t very interesting. However, when you apply a sine function to nudge, you can make time appear to stretch in a smooth way:

d1 $ sound "cp*4" # nudge (slow 8 $ sine)

Different pattern densities, scaling, and sine speeds interact with each other to create different results:

d1 $ sound "cp*8" # nudge (range 0 2 $ slow 16 $ sine)

spaceOut

The spaceOut function lets you specify a list of cycle speed multipliers, and then plays the pattern exactly once at each speed:

d1 $ spaceOut [1, 0.5, 1.33, 0.1, 2] $ sound "cp*4 cp*2"

The above code will play the cp*4 cp*2 pattern at 1, then 0.5, 1.33, 0.1, and 2 times the normal cycle speed.

Where spaceOut gets a little more interesting is when you use Haskell’s list syntax to build longer lists of linear (or non-linear) values. Consider this spaceOut pattern that plays at speeds ranging from 1 to 3, incrementing by 0.1:

d1 $ spaceOut [1,1.1..3] $ sound "cp*4"

The above pattern has 30 different speeds (!) but with very little code.

You can achieve speed “oscillations” that resemble a triangle wave by adding two lists together with the ++ operator:

d1 $ spaceOut ([0.1,0.2..3] ++ [3,2.9..0.1]) $ sound "cp*4"

You can use many different Haskell features to build lists. Here is a different method that constructs lists of fractional values using map:

d1 $ spaceOut (map (1/) [1,1.5..10]) $ sound "cp*4"

Live streaming on YouTube

Here’s a guide for live streaming your TidalCycles session to YouTube.

This is the set-up I use so it’s specific to Mac with SuperDirt and Atom. There a load of ways to achieve this so it would be great to see the guide expand.

Requirements

Instructions

Soundflowerbed

  • Launch SoundFlowerbed
  • A status icon will appear in the top menu strip. Click it and tick the ‘Built-in output’ option under Soundflower (2ch)
  • Also on the top menu strip, click the speaker icon and from the output device options select Soundflower (2ch)

SuperCollider

  • Launch SuperCollider
  • Run the following command in SuperCollider by pasting it in the input window and hitting Shift + return anywhere on the line:
Server.default.options.outDevice_("Soundflower (2ch)")
  • Hit Cmd + Shift + L to recompile the class library
  • Launch SuperDirt with:
SuperDirt.start

In the post window you should see something like:

"Built-in Microph" Input Device
 Streams: 1
 0 channels 2

"Soundflower (2ch)" Output Device
 Streams: 1
 0 channels 2

This confirms that SuperCollider will output to SoundFlowerbed, which will act as the audio input to OBS for the stream.

Atom / other text editor

  • Launch Atom and save a new .tidal file
  • Exit full screen if that’s how the application is currently set. This is to overcome an issue with OBS detecting full screen application windows.
  • It’s also worth increasing your editor font size a few points so it’s clear in the stream.

OBS

  • Launch OBS
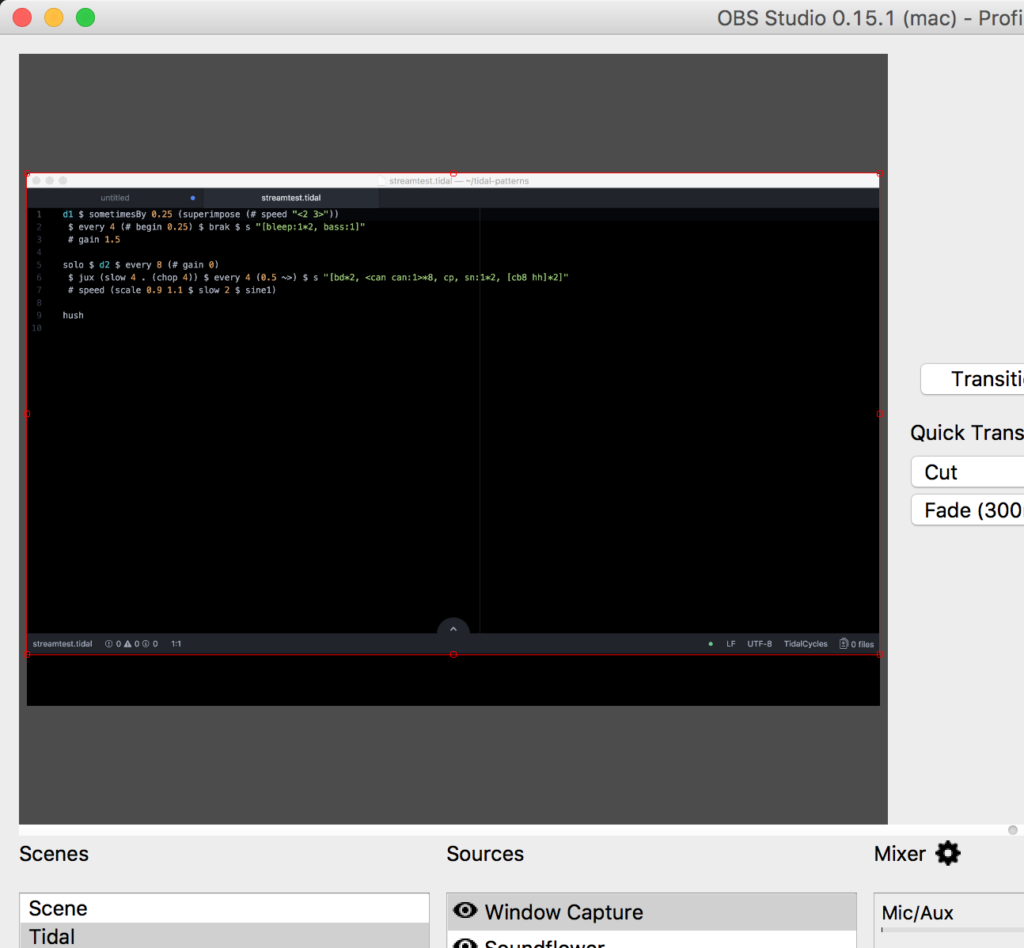
  • In the Sources menu click the sign and select Window Capture from the list of available options.
    Soundflowerbed sources
  • In the next screen select the application and file name combination that matches your text editor.
  • Switch back to your text editor and set it to full screen mode. Then head back to OBS.
  • You should see a stream of your text editor being rendered in OBS.
    OBS screen capture
  • Click the sign again to add your audio stream. Select audio output capture and select Soundflower.

YouTube

  • Log into YouTube with an account you want to use to broadcast your performance to the world.
  • Click your user avatar in the top-right corner of the screen and select Creator Studio.
    Youtube Creator Studio
  • From the left-hand panel select Live streaming > Stream now
  • Enter basic information for your stream.
  • Under the encoder set-up section at the bottom, click Reveal to display your encoder key and copy it. This will be used to authenticate your stream with YouTube.

Back to OBS

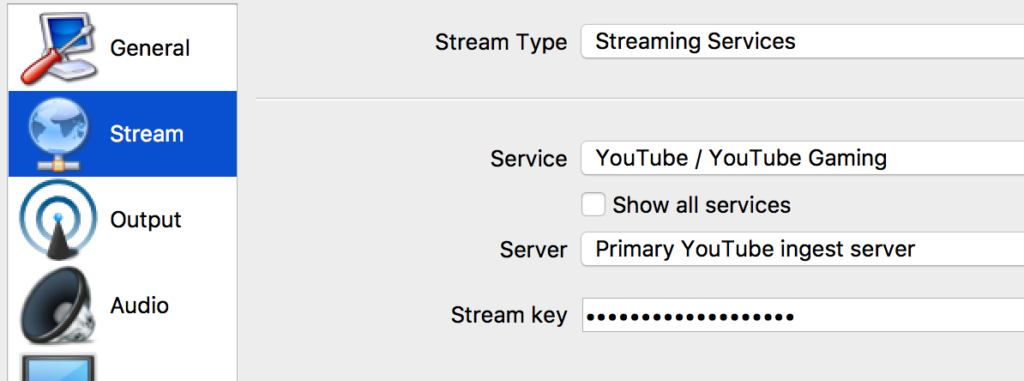
    • Enter Settings and select Stream from the left-hand panel.
      OBS stream settings
    • Apply these settings:Stream type: Streaming Services
      Service: YouTube / YouTube Gaming
      Server: Primary YouTube ingest server
      Stream Key: paste the key you were given on YouTube

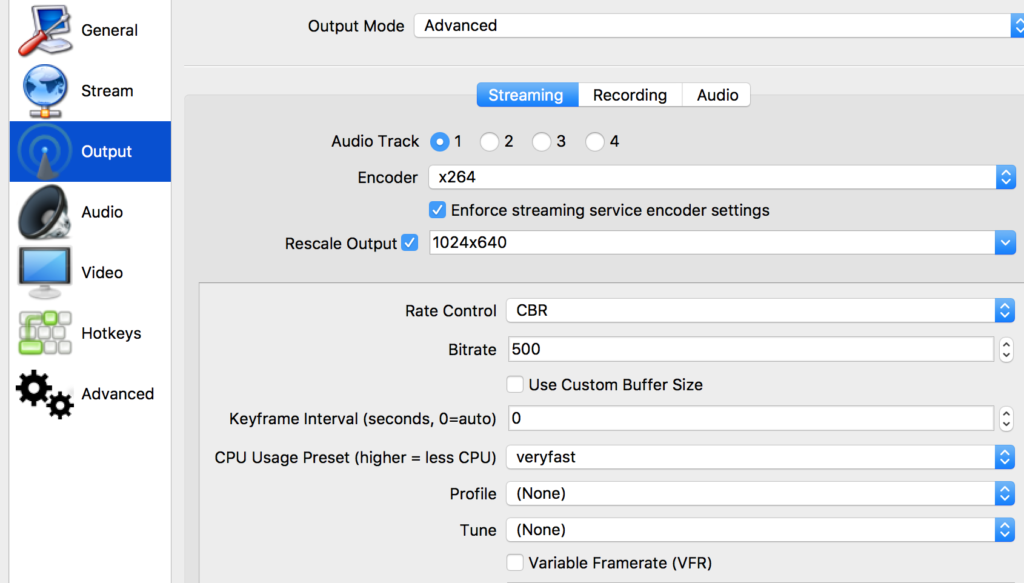
OBS Output Stream settings

You may wish to experiment with different settings for your stream (the bitrate in particular), I found these work for a decent resolution and audio quality, without encountering buffering issues.

OBS output settings

Encoder: x264
Rescale output: 1024 x 640
Rate control:  CBR
Bitrate: 500
Keyframe interval: 0
CPU usage preset: very fast
Profile: none
Tune: none

Start streaming

You’re good to go.

  • Click Start Streaming in OBS. In a few seconds the steam will be live on YouTube.
  • When you’ve finished click Stop Streaming and YouTube will create a recording in your channel. You can choose whether to share, edit, delete, and so on.

And finally, here’s one I made earlier.